Check tracking and tension of all timing belts
WHAT YOU NEED
Tools:Combination Spanner SetSecurity Torx Key SetAllen Key Set (up to 16 mm)Large Flat Head ScrewdriverFeeder Belt Tensioning Tool - RAZ014Air Gun
Safety Equipment:Standard Personal Protective Equipment
Other Equipment:Step Ladder
 Preparation
- Using the Manual Mode window, move the Y-axis to the middle position and the Z-axis to the lowest position.
- Isolate the saw electrically.
- Remove the rear end cover of the Y‑axis assembly (to access the Y‑axis belt).
- Remove both rear side feeder guards (to access the feeders' belts).
- Use an air gun to blow down the saw from top to bottom.
 Feeders' drive belts
-
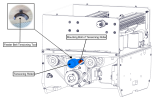
Inspect the infeed and outfeed feeders' drive belts for wear and tension.
Note: the belts are located at the rear of each feeder, directly behind the rear side guards.
-
If tension is incorrect, use a 16-mm Allen key to loosen the mounting bolt of the tensioning roller.
- Place the feeder belt tensioning tool on top of the tensioning roller.
- Tighten the feeder belt tensioning tool with a spanner until correct tension is felt on the belt.
- Re-tighten the mounting bolt of the tensioning roller.
- Loosen and remove the feeder belt tensioning tool.
 Y-axis belt
-
Inspect the belt for wear and tension.
Note: the Y‑axis belt is located directly behind the rear end cover of the Y‑axis assembly.
-
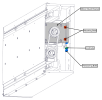
If tension is incorrect, loosen the mounting bolts of the motor mount bracket.
- Loosen the locknut on both tensioning bolts (not present on Z‑axis for machines manufactured before late 2016).
-
Adjust both tensioning bolts to move the motor mount bracket until correct tension is felt on the belt.
Note: a large flat head screwdriver can be used to help in moving the motor mount bracket (particularly if no tensioning bolts are present).
- Re-tighten the mounting bolts of the motor mount bracket.
- Rotate the pulleys by hand to check the belt tracking.
- If tracking is incorrect, repeat steps 2 to 6 modifying the alignment of the motor mount bracket slightly until both correct tension and tracking are achieved.
- Tighten the locknut on both tensioning bolts.
- Torque the mounting bolts of the motor mount bracket to 79 N·m.
 Testing
CAUTIONWhen using the manual mode, make sure that everything and everyone is clear of moving parts to prevent damage or injuries.
- Turn on the electrical isolation switch on the front of the saw.
- Release the E‑stop button on the operator console.
- Rehome the saw.
- Open Simple.
- Using the Manual Mode window, move any re-tensioned axis slowly in both directions to confirm the belt tracking.
- If tracking is incorrect, isolate the saw electrically and repeat the tensioning procedure for the relevant axis.
- Once both tension and tracking are correct for all timing belts, refit the rear end cover of the Y‑axis assembly and the rear side feeder guards.

